I thought I'd start off by giving you some background, but please feel free to skip this paragraph if you don't care. When digital cameras first came out, I wanted one. I was just a young'n at the time though and had enough sense to know my parents weren't going to buy me something so expensive. So I waited patiently and even with a minimum wage job knew it wouldn't be a smart investment, but now that I have something more concrete for this summer I figured that it was time to take the plunge and found a great deal on the Canon PowerShot SD 450 Digital ELPH camera on Amazon, so I got it along with a neat, slim leather case and a 512 MB SD memory card. I'm very much an amateur and will mainly just be doing a lot of point-and-shoot photography, but I can definitely see it developing into a minor hobby because I always see a lot of picturesque scenes. Anyway, the point is that I'm no expert in this stuff so take what I say here with a grain of salt. All I know is what I've read in the manual and from doing research the past few days in photography and all the research I've done into digital camera reviews in the past few years yearning for one.
In my opinion, Canon is the best around for low-end digital cameras. I find the popular Sony Cybershots to be cheaply made with bad software, Kodaks to be a little too simplistic (i.e. I'd like more control), and I just don't care for the design of Nikons; although I have no beef with Fujis. Anyway, the point is that the Digital ELPH line is famous for having some great, ultracompact cameras, which is what I really wanted. What's the use of a camera if you can't carry it around everywhere? I can't take pictures of the camera itself, but you can find plenty of those here, and it's even sexier in person. It's hard to show how small it is, but it really is amazing that I can fit it in my pocket with my cell phone, and it's thinner than my cell phone (even in the case I got). The body is quite sturdy, and yet relatively lightweight. I tripped over my brother's dog and thought I had slammed the camera against the wall. The screen went off, but when I turned it on again it was fine, and no noticeable marks on the body (other than one small spec on the side). You'll definitely feel proud to hold it in your hand. The 2.5" LCD screen is gorgeous and one of its selling points to me. It's amazingly bright, and supposedly it adjusts itself for the environment you're in. This is probably true since it always looks just right (i.e. I've never had to manually adjust the brightness, though you can). The few buttons you have on the back are laid out well and definitely minimizes confusion. They are a bit small so it's easy to miss pressing one, but that's to be expected and not a big deal. There's also a viewfinder, which I've never used but is probably good if you're running low on battery since the LCD sucks up so much power.
The box includes the camera, a good amount of documentation, some stellar software, a USB cable, an A/V cable, a 16MB memory card, a proprietary Li-ON battery, the battery 's charger, and a wrist strap (which I didn't use because of the case I got). This is a great package except for the memory card and the lack of an actual case, which you'll want so that you can protect the pretty LCD display. The software works on Mac and PC and is very intuitive. It makes the whole process of downloading and viewing your pictures quite painfree, and it's very easy-to-use (a common theme with this camera). The A/V cable was a surprise to find in there, and it's great because the camera has a slideshow feature you can exploit better by connecting your camera to a TV and just letting it do its own thing. The slideshow actually has some fancy transitions and selection options, though the software for the PC has even fancier stuff, of course. Many people seem to have issues with the battery, but it's supposed to last 150 exposures and this is probably about right. I played around with it for a couple of days before it died on me, and I'd say that it would last at least a full day of exhaustive use. Though it is a bit pricey to replace (~$40). Ready for a picture?

I started with that one because it shows how well the camera can perform in just plain Auto mode. I read reviews claiming that it was lacking in manual settings, but I thought that it had just the right amount of manual features. Granted, it wouldn't satiate a true professional photographer, but your average person isn't going to need all those bells and whistles. Also, the features it does have are pretty easy to get the hang of. I was navigating the camera's menus like a pro within a day of reading the manual and messing around. Let's run through the still image shooting modes real quick. There's Auto, Manual, Stitch Assist, Digital Macro, Portrait, Night Snapshot, My Colors, and Scene Mode. With Manual, you can mess with the Exposure Value (EV), White Balance (important if the picture lacks white, but they have presets for Daylight and fluorescent light and such), Photo Effects, and Picture Quality. How important are these factors? Well, some people think that the small flash on these ultracompacts render it useless when you're not close to dark objects, but check this out:

I'm actually zoomed in on the flowers with the flash on, but still too far for it too make much of a difference. Oh, and the quality on the images really are quite good, but I've shrunk them to make them easier to see and download. Anyway, all I did was increase the EV and the ISO (the light sensitivity) to make it look brighter. So, you really can take charge of challenging situations even with this tiny little camera. And that brings me to the ISO situation, which is easily accessible by a button rather than a menu. Here's a comparison of the same picture with increasing ISOs:
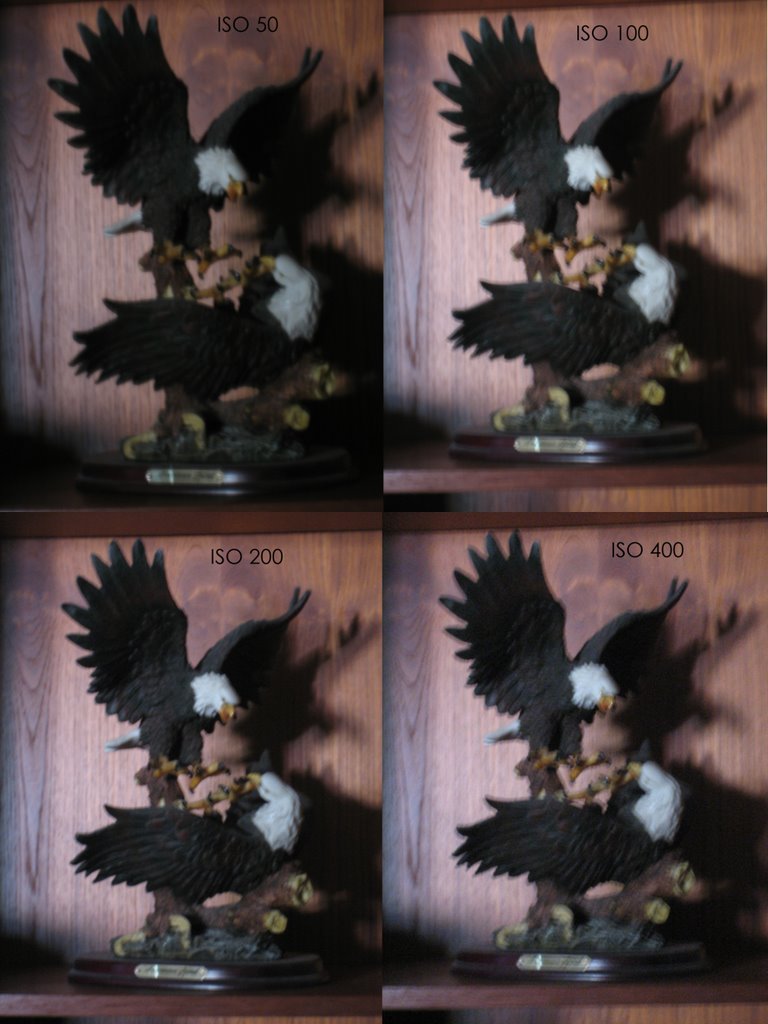
The increased amount of noise is expected, and I'd say that it actually does a pretty decent job of keeping in under control. In fact, if I didn't show them to you side-by-side you probably wouldn't notice a quality hit except for the 400 setting. In the Photo Effects you can apply Low Sharpening, Vivid, Neutral, Sepia, or Black and White, all of which are rather self-explanatory. The picture quality selections are also pretty self-explanatory. You can do Superfine, Fine, or Normal (most of my pictures are shot in Superfine) for the compression, and Large (2048 x 1944), M1(2048 x 1536), M2 (1600 x 1200), Small (640 x 480), and Postcard (imprinted M2) for the resolution. Most of my shots are M2 Superfine, but here's a difference I noticed in the compression between Fine and Superfine while conducting my Macro tests:

I took them at different times so the lighting is better in the second one, but pay more attention to how much more detail the second has. Also, the second shows how great the Digital Macro mode is. It got the exact shade of pink on her dress, and it even caught some dust on her left ear. The Macro mode, for those of you unfamiliar with it, is used for items very close to the camera lens. I decided to see if it would work well outdoors under some more natural light, and it did:

I was impressed with how it focused on the flower and the red really pops out well. I skipped over the Stitch Assist though, so let me back it up. If you want to take a panoramic picture, like if you're standing on top of a mountain or something, you can use a neat feature on the PowerShot to snap it. Just go to that mode, select vertical or horizontal and left-right or right-left, and start clicking. After you click a shot, it'll show the first half of it on your screen so you can shoot the next half in your second shot, but what you're really doing is overlapping the pictures to help out the computer later on in stitching them together. They included a piece of software called PhotoStitch, but I couldn't get it to install right on my parent's computer so I tried some freeware and this is what it spit out:
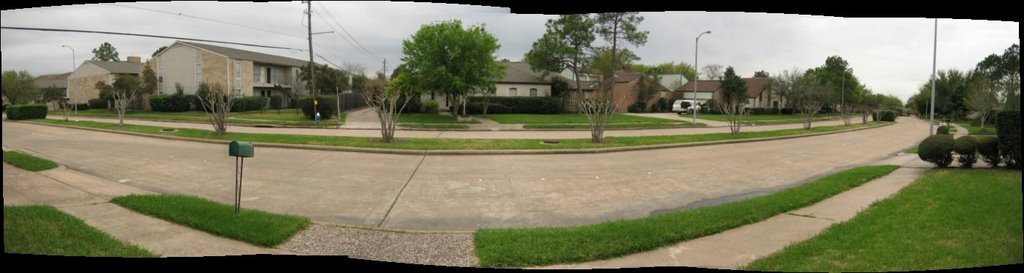
The camera just made it so easy to take, and you can take up to 26 shots to get a really detailed picture (I just settled for about 6 here). Also, when I downloaded it to the computer, it put them all in its own folder! Speaking of downloading pictures, it's really quick and can be controlled straight from the LCD. You can choose the pictures you want, choose them all, or just download the "new" ones (i.e. since the last download). Moving along, I had heard bad things about the red eye effect on this camera because all ultracompacts have to place the flash close to the lens, which causes this problem. I didn't notice this at all my first couple of days, but I started shooting some people in Portrait mode (and even outside of it) to see a bit of it. Fortunately, most of these were easily corrected by Canon's software. Here's a demo of that:

If you look closely at his eyes, they look pretty normal after the fix. You're not always this fortunate, but typically you will be. It's an unavoidable compromise for the camera's small form factor, and I feel that it's acceptable. If you're really anal, you can just take it in Sepia or Black and White instead. I showed a Sepia one on Friday, and you'll see the latter very soon. The last still picture mode I want to talk about it My Colors. I didn't mess with Night Snapshot (sorry), and the Scene Modes are pretty specific. You can use them for the Beach, Fireworks, Pets and Kids, Snow, being Indoors, and being Underwater. The My Colors thing though is really cool. Some would call it gimmicky, but I don't care because I love it. Let's say you wanted to see a different wall color? Then you can use Color Swap to change it:
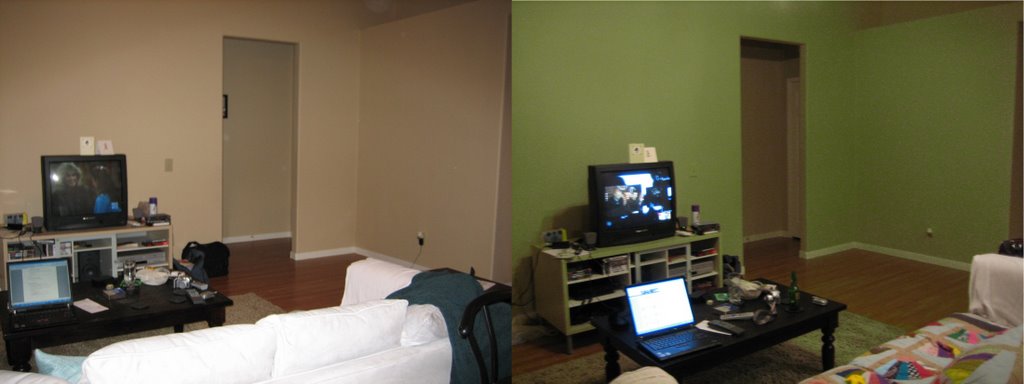
The left picture is what my brother's living room really looks like, and the right one is if they were green instead. It's not perfect, as you can tell, but you can actually adjust within how many shades in the picture (if any) it can tolerate to change their color as well. My Colors will also let you make red, green, or blue bolder or use Positive Film, but the real kicker is the Color Accent feature. Let me show you what this produces:
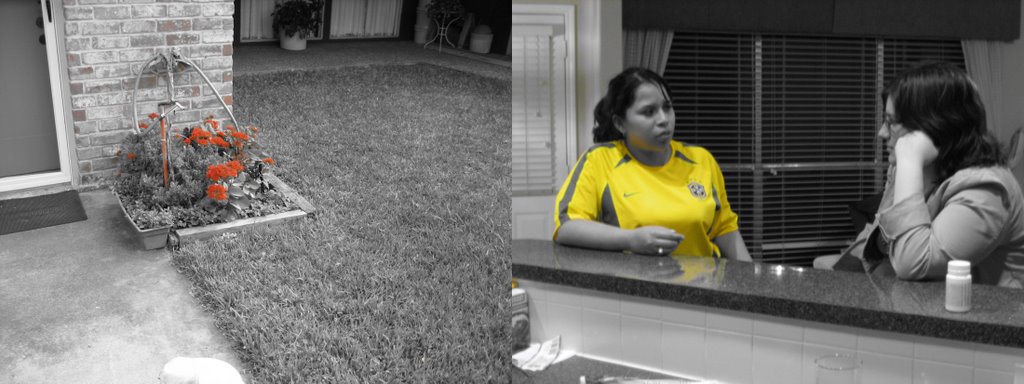
I couldn't decide which to use, so I thought I'd throw in both. Obviously, this allows you to make everything black and white except for a single color. The former is outside and the latter is indoors, and both came out real well. This isn't a must-have feature, but I consider it a really fun addition to the camera and gives you a little more artistic freedom if you're an amateur like me. I like to call this the Sin City effect, and you can actually even do it in the movie mode. Speaking of movie mode, you can see a 640 x 480 video over here of my brother's dog, and you can see a 320 x 240 sample of one of my cousins being tickled for some Monopoly money over here. The compression isn't half bad, but the larger one definitely has better quality. I accidentally had the Vivid color effect on in the latter, but it does leave a little to be desired out of the video quality. It all depends on how you set up the setting though, and you can actual mess with the White Balance and Photo Effects in movie mode, plus you can take fast frame movies (which I didn't try yet) and use My Colors. The last feature I want to mention is the Continuous Shooting mode. There is a time delayed shooting mode, but it's just what you'd expect except that it's very quick and easy to switch to. Anyway, for Continuous Shooting you just hold down the shutter release and it'll keep taking pictures until you release, but you should turn the flash off to get the best results. Here's what I got from my cousin dancing:

It was expectedly blurry, but it looks really neat when you quickly scroll through them, and I think it's good for situations like that where you don't want video but you do want to capture the motion. The camera has some other nifty features to it that just really fill in the cool factor. Like if you turn it on its side, the LCD will display the picture vertically. And you can change the startup image and sound. And you can watch slideshows on it. I guess this review has been too positive though, so I'll talk about what I didn't like. The battery life could've been better (I wish there was a battery life indicator) and the red eye looks a little bad on the LCD screen, but both of them are common in this class of cameras. The movie mode isn't spectacular, but at least it affords you some control and you even have on-the-fly movie editing (to cut extraneous frames from the beginning and end). I would've liked some more control over the shutter speed or even just image stabilization, but I suppose I can live without it. If I wanted to be nit-picky I'd say that it can get fuzzy around edges and show you this example:

However, I still say that it handled that picture damn well. Only a trained eye could notice the purple fringing at the top or any fuzziness, and I don't even really care. The pros of the camera are numerous: sickeningly small, gorgeous LCD, extremely easy to use, just enough user controls, a few bells and whistles, surprisingly fast capture speeds, and histograms available in the playback mode among others. I'd definitely recommend it to a friend, and I look forward to putting up more pictures from it as interesting stuff happens to me. Now to end what may be the longest post I've ever made, though I hope you all enjoyed the pretty pictures I assembled for you all with this review in mind for the past few days.


No comments:
Post a Comment